2nd United States Sharpshooters, Company D
  • Home
  • About
    • Meet Company D
  • Military Life
    • Uniforms and Gear
    • Drill and Tactics
  • Research Library
  • Civilian
  • Armory

Uniforms and Gear

Welcome to our uniforms and gear page.  These resources explain our gear and list articles and resources to improve your impression.  Texts in italics are straight from army regulations.

Revisiting the Maple Leaf...again!

9/19/2018

1 Comment

 
By 1st Sgt. Koepp

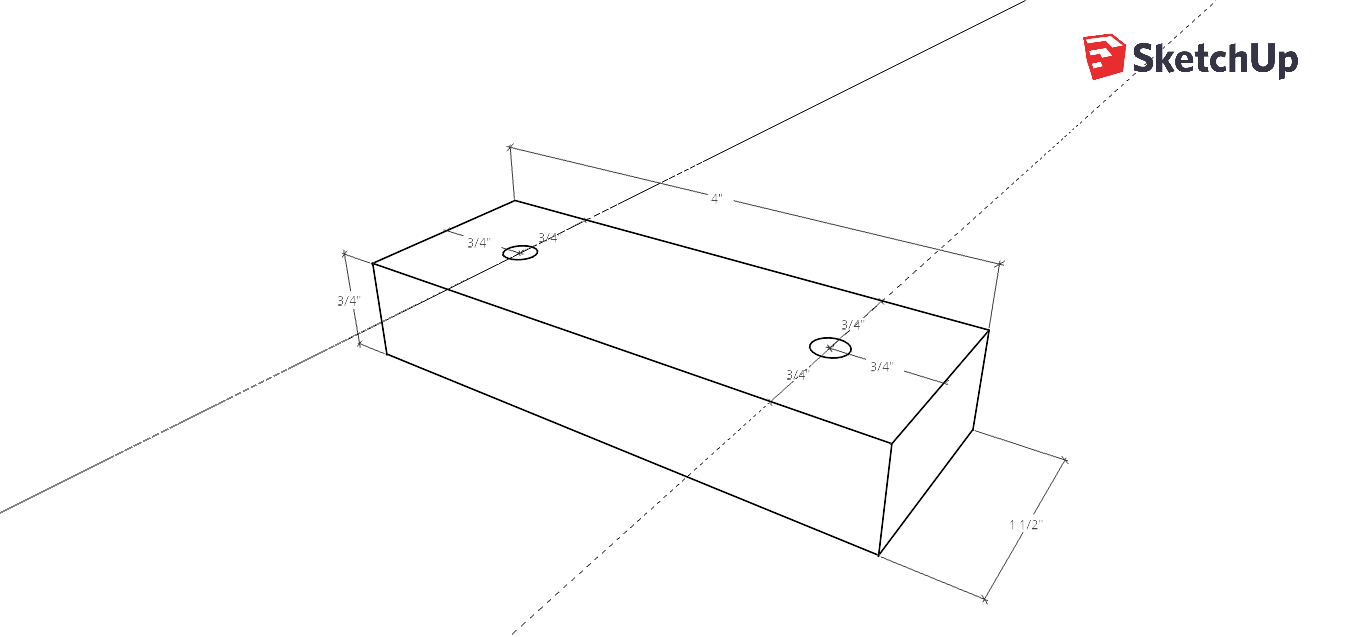
     New research and a new tent stake!  "Okay, we get it 1st Sgt.  You have a weird obsession with Civil War tent stakes."  I do!  I believe this style of "Common Tent Pin/Stake" as referred to in the 1865 Quartermaster Manual is the closest I've come yet to replicating the Maple Leaf pins and common Civil War stakes in general.  Still, few images exist of this type of once common tent stake.  According to the Quartermaster Manual, the common pin should be 16" long, 1 1/4" wide, 1" thick, of defect-free white oak, with a notch 3" from the top.  To make these, I used 3/4" red oak from the box store.  3" from the top, I drilled a 3/8" hole to be the end point of the notch.  The notch is 2" long.  I made a 3/8" hole for the hook of the notch figuring that would have been most likely the largest rope they would have used for tenting and would comfortably hook the loops on a "common" tent.  The top, long slant is an angle of 3/8" from the edge of the stake down to 1 1/2".  The small back slant is an angle of 1/4" to 1/4".  The spear tip is 2" long tapering to 1/4" in the middle.  I chamfered all the edges with a block plane for increased durability.  It's hard to tell if the originals had an additional side taper on the spear tip or if they were just as shown.  I've seen one just like I made.  Either way, the manual doesn't specify.
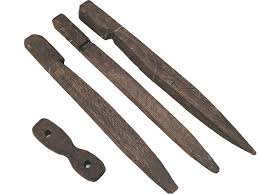
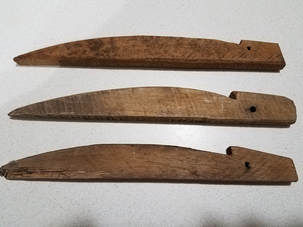
     These are really long tent stakes as you can see in the comparison photo.  There are at least two more sizes listed in the manual.  One being about 2' long!  One of the longest having two notches that I imagine would have held the wall tent wall uprights as well as the fly ropes.  These would certainly be overkill for a dog tent especially when compared to the relatively small turned oak pins that were initially issued.  I think these would work great for a standard NCO wall tent or even larger.  They'd also probably work well for tent flies.
     I'll be posting more tent stake photos as I work my way through the Quartermaster Manual, though I have a growing stockpile of assorted period tent stakes that I don't know what to do with.  I'm still quite fond of what I'll now call my "French style" oak tent stakes.  The one the middle of the first photo.  They fit very well with the styles of the time and would even fit into the camp-made category.  They work well for securing A tents and dog tents.  Just remember, when you use wooden tent stakes/pins be sure to use a wooden mallet!
     
1 Comment

Civil War Hospital Slippers --First Attempt

8/25/2018

1 Comment

 
By 1st Sgt Koepp

     As usual, we're researching the odd and the obscure and this item is almost entirely lost to history.  This time, I've decided to have a go at recreating the Civil War hospital slipper.  This is one of several variants you can find in original sources.  Like most historic patterns some of the instructions can be quite vague or omitted altogether.  Mrs. 1st Sgt and I spent quite a bit of time debating the heel construction.  Either way, this one came out looking and working like a slipper.  The pattern I used doesn't have a sole like we would imagine a modern slipper having.  Though, another pattern from the Sanitary Commission did call for a pasteboard insert in between the layers of material.  If you think about it, these just needed to keep a soldier's feet warm and be durable enough to walk a hospital floor.  However, carpet slippers in general were common back then and were well known for their durability.
     For construction, I used some scrap old-timey looking upholstery fabric and "lead colored" cotton flannel like the pattern called for.  I couldn't say the upholstery fabric is correct, but this is just a proof of concept project at this time.  I am working on tracking down some authentic carpet for future pairs.  I used the original pattern to cut out the upholstery and then I traced that pattern onto some newspaper and added a 3/4 hem allowance for the flannel lining.  I used that pattern to cut the flannel.  The rest was like the instructions.  I placed the outer material on top of the lining, rolled the hem and used a whip or felling stitch to secure it.  For the toe, I used a ladder stitch.  The pattern says these can be made in a hour but decoding the pattern for the first time took quite a bit more time than that as we were unable to find any images of surviving examples.  These are simple to make once you get the hang of it.  I'm still not 100% that I sewed the heel according to the instructions, but it looks the part and holds the form well.  I just have to make the other one.  I do plan on making copies of all the patterns I can find and I'll be sure to share them with you as I go.

The Pattern I Used from the Library of Congress
1 Comment

Machining the Pull Through Brass Ferrule

4/25/2018

0 Comments

 
By 1st Sgt. Koepp

     In the words of the great Ron Swanson, "Buying things is for suckers."  Well, in this case, I couldn't find the 10-32 threaded ferrules to buy if I wanted to.  So, breaking with our tradition of "every man" projects, I figured I'd show how I went about recreating these oddly difficult to find items.
     I started with ordering a couple of 1/4" brass rods from Amazon.  I cut them to easy to work lengths on my bandsaw and headed over to my buddy's shop to use his machinist's lathe.  I locked in the brass rod into the three jaw chuck and put a center bit in the tail stock chuck.  Center bits are really important when boring.  Their stout design doesn't allow them to wander like a regular twist bit.  You can also buy these affordably on Amazon.
     With the lathe running at a moderate speed, I began "pecking" at the end of the brass rod with the center bit until it started to really dig in.  With the starter hole and counter sink cut in, I began working my way in drill bit sizes until my final 5/32" bore.  According to my handy dandy machinist's app, 5/32" is the proper bit size to tap 10-32 threads.
     I bored several blanks before returning to my shop to finish the ferrules.  I cut them to exact length then chucked them into my drill press to square and smooth each end.  Finally, I grabbed my tap and some tapping fluid and cut in the threads.  I locked the ferrule just snug enough into the vice to resist the tap.  Be very careful because the brass is soft and too much vice pressure will turn it into an oval in no time.  When you're done with that, all you have to do is thread in the 4mm leather thong, take it out, apply some two part epoxy and reinstall to let dry.  The end result is a surprisingly rare, but authentic brass ferrule Civil War pull through cleaner.  Just screw in the brush of your desired size.
     Now, if you don't have access to a machinist's lathe, don't worry.  If you have some patience and a little extra time, you can do this same thing reasonably well with a drill press.  You see in one of my photos that I put the drill bit squarely in the vice and not in the press.  I put the brass blank in the drill press chuck, effectively turning the drill press into a vertical lathe.  There are some really clever YouTube videos out there that can walk you through the entire process.
0 Comments

Recreating the Sharps Pull-Through Brush

4/15/2018

7 Comments

 
Picture
By 1st Sgt. Koepp

     It wasn't until the research of Pvt. Ternan about a year ago that I learned these were actually a thing.  I was under the mistaken assumption that pull-through cleaners were a 20th century item, much like you would see issued with a 1917 Enfield or 1903 Springfield.  However, not only were two styles of these brushes available for the Sharps rifle, but they also existed for other calibers.  I'm guessing their relative scarcity today has more to do with the fragility of their natural construction rather than lack of use.  Having one of these in your implement pouch would be immensely useful because, as you all know, Sharps rifles don't have a cleaning rod.  Though rods were likely issued in the crates maybe 1 for every 10 rifles.
     Now, you can sometimes find originals on Ebay for around $100-150.  The carbine models tend to be a bit cheaper but I've resisted buying one because originals are .52 caliber and our reproduction Sharps are .54.  So, after studying many pictures and the book, "Gun Tools Their History and Identification," I thought I'd begin my experimentation.  My design ideas will look the part, though as of now, won't be 100% authentic.  I wanted my design to be accessible to everyone to try to experiment with.  If you have some brass round stock and a machinist lathe, this wouldn't take long to build, however, not many people are set up for machinist work.  Also, original brushes were made of natural materials and the one's I've seen weren't brass bristle.  So, clearly, I'm only at the proof of concept stage.  
     As with many Civil War items there is a great deal of variance in surviving examples.  These include differences in brush material, brush length, thong length, and even if the ferrule was female threaded or fixed to the brush as a solid item.
     I started with making the late/post war single thong Sharps pull through, though single pulls existed and in many other calibers.  I chose to recreate the models with a threaded female ferrule to increase its usefulness and it appears these were more common.  This way you can replace the brushes as they wear out or even use a mop if you like.  Though, those weren't used then.  I'm just saying this is more adaptable to modern cleaning practices.  I found an original example online that had a thong that measured 39 1/2" and checking that length to my Sharps; it appeared a good length.  I chose a 3/4" long ferrule with a 10-32 thread, easily found at a good hardware store like Ace, because that is a very common modern industry standard for black powder cleaning implements.  Finding leather thong online is very simple to do.  I found that 4 mm thong fits beautifully into the ferrule.  I simply find how much of the thong needs to go in before it hits the top of the brush threads.  I mark that distance, remove the thong, apply a light coat of two part epoxy, and reinsert the thong to dry in place.
     The part I'm struggling with and could really use your help with is that I can't seem to find a brass "spacer" or "standoff" as they're sometimes called.  I can only find them in aluminum.  I think I've seen steel, but you don't want a hard metal involved in your rifle cleaning setup.  While aluminum was known of and did exist during the Civil War, it was more expensive than gold and really only existed in science laboratories.  Commercial availability of aluminum didn't come about until many years later.  I can machine them in brass but that eliminates the "common man" nature of the build.  If it comes down to it, I might just end up machining these and selling them.  So, if you know a place to buy 10-32 or even 8-32 1" long brass standoffs, please post a comment on our Facebook page so we can bring this part of Sharpshooter history back to life.  
     In the meantime, I'm going to try out my aluminum ferrule and see how it works.
7 Comments

Making a Civil War Cone Pick

4/11/2018

2 Comments

 
 By 1st Sgt. Koepp
     I guess by now, I should be less surprised that such a simple item as cone pick isn't represented in a how-to.  I'm pretty passionate about recreating the obvious, the overlooked, and under-represented. I've made some educated guesses as to how to make these based of photos of originals and what I've read.  I admit this is an experiment and bit of a proof of concept.  The one key piece of information I'm lacking is the actual wire diameter of the originals.  I tried piano wire at first only to find that it was a bit over kill.  I then thought I'd try some 18 gauge wire I had in my shop and after some heat treating it seems to work great.  My 18 gauge wire measures .039 inches.  If someone reading this has reliable thickness readings on an original, please share it with the community.  Enough preamble, let's get into how I did it.

What you'll need:
  1. Wire.  I used galvanized--avoid it if you can.  When galvanized metal gets hot it releases poisonous gas.  I have air scrubbers, lots of ventilation in my shop, and experience so I did it, but I recommend regular steel wire.
  2. Propane Torch or reliable heat source.  Mapp gas will be much too hot a flame.
  3. Hammer
  4. Needle Nose Pliers
  5. Wire Cutters
  6. A form to help bend the wire.  The loop should be 1/2" wide.  In my case I found a 1/4" drive 11/32" deep socket met that requirement just fine for me.
  7. Bench Vise  
  8. Container of Water
  9. Container of Oil.  I used SAE 30.
  10. Tape Measure or Measuring Device
  11. Belt Sander or File to make a taper on the end of the pick

     I start with cutting a piece of wire longer than the finished product to give more to hang on to.  I then lock my form into my vice and using my fingers bend the wire into a loop around the form.  I use the needle nose pliers for any minor adjustments.  I then trim the pick to length.  The documentation I've consistently seen states the shaft should be 1 1/2" long.  I then take the pick to the belt sander and rotate the pick to get an even point on the end.  Using my hammer, anvil, and fingers I straighten the wire to my liking before moving on.  After that, I fire up my propane torch and with the pick in a pair of pliers, I try my best to evenly heat the pick to a red hot.  This only takes a few seconds.  Once there, I quickly quench in water to harden the wire.  For a bit of rust protection and nicer finish, I'll simply re-heat and quench in oil.  The second heat is just to warm it up.  I don't try to make it red hot again.  After it cools for a few seconds, I wipe clean and it's ready for service.  When you flick the end of it with your finger, it should spring back to shape and not easily bend.  Keep in mind, it's wire so it will bend with enough force but should be considerably harder than when it came off the spool.
   This only takes a few minutes to do and is quite rewarding.  If anyone out there has more technical information on the originals let us know on our website or Facebook page.  Also, if anyone is more knowledgeable in metallurgy than me share a tip if you have one.
2 Comments

How to Make a Simple Pocket Watch Chain

3/19/2018

4 Comments


 By 1st Sgt. Koepp
    
     A proper pocket watch chain is just as important as the pocket watch.  Unfortunately, finding proper chains can be sometimes be a real challenge.  The ones that come with modern pocket watches are not period correct.  The type of straight chain with what looks like a belt clip on the other end is designed for the modern user.
     You can find pocket watch chains on Ebay, but you can also make your own.  Chains and charms that were attached to them reflected the owner's style and personality.  Making your own is inexpensive and gives you an opportunity to express your historical personality.  The first photo shows my watch and chain.  I, like others in our company are Freemasons and express this through my watch and chain.  The pocket watch isn't technically period correct but the Masonic emblem is the style of the period.  More importantly, this illustrates the three main parts of a watch chain.  You have a chain to the watch that is about 9 or so inches for a single pocket wear, a 1.5 to 2" chain to the t-bar or toggle that goes to the buttonhole, and another same size chain to the charm.
     Antique watch chains have parts that are pretty much unique unto themselves.  The "dog clip" that clips the chain to the watch and the triple ring that attaches the chains together, are parts I haven't seen elsewhere in jewelry making.  Let's jump in to the construction details and I can share with you how I work around these.
    First, you'll want to visit a local craft store and check out the jewelry section.  If you're at Michael's, don't forget your coupons!  I recommend by starting with choosing a chain.  I recommend starting out with a simple chain in either silver, gold, or copper.  I chose antique brass for this example and finding the spring clips I needed was really difficult.  In fact, I had to use a "lobster claw" clip for the charm chain rather than a 6 or 9mm spring clip.  Once you have your chain, find a pack of "jump chains" that fits with the style.  The jump chains will hold the three chains together and will attach your chains to the proper spring clips.  Ideally, you'd already have your pocket watch with you to help you chose the large spring clip that will clip to the pocket watch.  If not, a 12mm should cover most sizes.  Lastly, you'd also hopefully have a charm chosen, but if not, chose a spring clip about 6 or 9mm to attach the chain to the charm.  If it doesn't end up big enough, that okay, just put a jump ring on the charm and the ring will easily fit into the spring clip.  Then you'll need to chose a toggle to hold everything in your vest's buttonhole.  Toggles are typically used for bracelets and sometimes necklaces.  They come in 2 piece sets.  You'll have a bar toggle that will serve as the t-bar and a loop.  You won't need the loop, but be sure to choose a toggle big enough that it won't fall easily out of your button hole. Before you leave, you may want to pick up some small, smooth jaw needle nose pliers and a pair of diagonal side cuts, if you don't have any.
     Once home, all you have to do is cut your lengths of chain.  My original has two lengths, one at 9" and 2 pieces at 1.5".  Join them all with a single jump ring in the middle.  Attach the toggle to the upper short chain with a jump ring.  On the charm ring, attach the small spring clip with a jump ring.  Finally, attach the large spring clip with a jump ring and clip on your pocket watch.  Congratulations, you've made your very own simple pocket watch chain.  This example is just a spring board for future creativity.  You can see on my antique chain, that three different types of chains were used.  You can certainly do that, too.  One other thing you can do is to use longer lengths of chain.  If you do a Google image search for pocket watch chains, you'll see the other common way of wearing a chain was to go from one pocket to the other with the charm hanging from the buttonhole.  This is certainly a higher fashion way of rocking a pocket watch.  
     If you are looking for the correct pocket watch swivel clasps, you can find them on places like Etsy or Ebay.  They usually run about $8-10.  My above example is just to show what you can make with easily found craft store items.
4 Comments

Easy to Find Hardcore Tent Pegs

3/17/2018

2 Comments

 
By 1st Sgt. Koepp

     We have more reenacting secrets to share today.  As you've noticed, I've been sharing a lot of work and research on Civil War camping.  Recently, I turned a set of issued tent pegs as seen in A.J. Hammler's Civil War Woodworking Vol. 1 and referenced by Fredrick Gaede.  I made mine traditionally by riving blanks from a green log, fine tuning the billets on my shave horse, and turning them on my spring pole lathe.  This method posed some challenges since Hammler's design required using a round nosed scraper on the neck of the peg.  Scrapers aren't really for green woodworking as they leave a very rough finished as compared to the standard gouges and skews used in green wood craft.  This just means the originals were turned seasoned on power (steam/water) or treadle lathes.  If you have a lightly used CW original, you'd expect to see the cross marks of a live center probably on the head of the peg.  I think they came out alright and it was a great exercise for me to practice replicating turned items.  Being a student of military gear, as many of you are, I always thought this style looked awfully familiar.
     My local air museum had it's regular militaria sale that I always try to make.  It's small, but I always manage to leave spending more money than I intended.  After talking to a friendly reenactor from AEF Northwest (WWI), I wrapped up my shopping by stopping at my favorite vendor.  I purchased a full, original CW musket cap tin and a set of these WWII era (also inter-war era) tent pegs to share with you.  In my opinion, these are about as close to a dead-on alternative as you can get for improving your CW dog tent impression.
     In the pictures, you can see the WWII pegs and the ones I made from Hammler's book, which aren't perfect but pretty good for a first try.  I've also placed a WWII peg directly on top of Hammler's template for you to see the similarity and judge for yourself if this would be a reasonable choice for you.  I paid $4 each for my WWII pegs and that's about what they're typically going for.  $20 for a set of WWII pegs is a lot cheaper than investing in an electric lathe and a set of chisels and they're much more readily available.  Above all, they're much more hardcore than those ubiquitous iron stakes that have no business holding down a shelter half.
2 Comments

Tent Slips

2/11/2018

0 Comments

 
     If you're new to the hobby or you bought your first wall tent, tent slips are essential to keeping everything upright.  Basic ones, like in the template below are quick and easy to make.  My template, which lacks historical documentation is a style I've used for years.  These are cut from the straightest 1x2 boards I can find and drilled with quarter inch holes for the rope.  Mine are unfinished, but when I make them for others I always coat them with boiled linseed oil.  For the most period correct and the most common, you'll need to have a lathe and pick up AJ Hammler's Civil War Woodworking Vol. 2.  We did a video on how to hack the classic dog bone on the cheap so you can have the impression without the expense.  It will lack 100% authenticity but is still a large improvement over much of what you see at reenactments.  It seems all of the original slips would have been made from a hardwood.
     My template has worked on wall tents and tent flies reliably.  If you need a larger size, I wanted to share a formula I've read a few times.  The formula says that the slip should be at least three times the width of the rope and six times the length.
     Happy camping and let us know if you have any questions.
Picture
0 Comments

Hardcore woodworking...unplug those tools!

2/8/2018

0 Comments

 
 By 1st Sgt. Koepp
     As reenactors, we scrutinize fabric dyes, stitch length, diligently study manuals, and pay top dollar to the best makers, but the everyday items of camp life often get overlooked.  Campaigners pride themselves on living out of their knapsacks as if a solider never used a tent, carried items for a mess, or longed for the comforts of home.  Mainstreamers content themselves with "close enough" items from thrift stores and yard sales to everyone else's cries of "you're ruining my immersion!"  What if "hardcore" camp items were not only easily accessible, but easy to make with limited tools?
     Most Civil War woodworking items sold are made with modern machinery to keep costs down.  Most are good quality and the construction methods are undetectable. I know in my shop, the more hand tools I use the more the cost goes up.  I think many reenactors are missing out by not extending their passion for a quality immersion into the realm of camp life.  Whenever soldiers had an opportunity, they tried to make camp and their tents as comfortable and "homey" as conditions allowed.  As the war continued, Union soldiers gave up any remaining respect for secesh property they might have had and freely took advantage of whatever the South had to offer.  I recently read in Wilbur Fisk's writings that in a camp, a month after Gettysburg, the soldiers hunted down and re-appropriated boards and fence rails anywhere they could.  This meant tearing down barns, sheds, and other structures.  Soldiers had to carry what they could and officer's used horses and wagons for the same purposes.  Don't even get Capt. Whitehall started about all the stuff the Sharpshooters stole during the war.  Items like the tent stakes above, found in Hammler's CW Woodworking, are inspired by what many soldiers would have done.
      What I've done differently from Hammler, and what I encourage you to try, is to use only hand tools available at the time.  No special skills are really needed and the minimal investment required in tools can be used in many future projects.  As reenactors, we love a hand sewn button hole.  Why not try hand made camp items?
     My "hardcore" field-made stakes featured in one of our earliest videos required only an axe or a draw knife and a shave horse or a chopping block.  With a few simple hand tools, you can share the experience of turning stolen clapboards into tent stakes.  For this project, I used red oak I purchased from a big box store for less than $10.  The tools I used included:
  1. Crosscut saw
  2. Rip Saw
  3. 3/4" chisel
  4. Combination square
  5. Pencil
  6. Hammer
  7. Spoke shave -- though you could use a pocket knife
  8. Marking knife
     For those of you who may not be very familiar with woodworking there is a difference between a rip and crosscut saw.  Rip saws have different teeth to allow them to rip down along the grain of the wood.  You can use a crosscut to rip, it just takes a lot more work.  All these things you can find at a flea market or yard sale.  
     I hope this article helps to inspire you to extend your passion for detail into the creative world of soldier-made camp items made in a period-correct way.
0 Comments

The Overlooked Maple Leaf Tent Stakes

1/29/2018

1 Comment

 
PicturePhoto from the National Museum of the United States Army
By 1st Sgt. Koepp

     As the company wood wright, I spend a lot of time researching camp artifacts to reproduce.  The best part of that research is recreating a piece from the Civil War that is either entirely unrepresented or nearly so.  So, when I saw some photos from the Maple Leaf, my gears began turning. The wreck of the Maple Leaf left behind many intact artifacts from the Civil War.  While you can visit museums back east and see them, photos online are scarce.  This photo, which links directly to a museum, had the well known yet under-represented peanut or dog-bone tent slip.  Yet next to it, are three tent stakes I had not seen reproduced.  My second thought, was "oh, I've seen those before!"  They reminded me of French WWI tent stakes.
     Having a few French WWI tent stakes in my collection the two eras are nearly identical with only the rope hole missing on the head of the Civil War stakes.  If you figure a Civil War dog bone slip is around four inches long, that would also put these at roughly the same length.  Tent slips are sometimes made from wood an inch thick but this image seems to indicate a smaller thickness.  I would guess somewhere around 3/4".  These also appear to be smaller versions of tent stakes sometimes associated with Sibley tents, but those could be nearly twice as long.
     I'm not only putting my research out there but I've also included what I think may be the only template online for these style of stakes.  This template is taken directly from an original French stake and like the photo above, all of them varied to some degree.  Two areas that stand out consistently to me include the degree of hook on the rope notch and the thickness of the "belly" of the stake.  The French stakes have some unique construction features in that they appear to ripped to thickness with a rough circular saw blade and then cut with some sort of bandsaw or turning saw.  Given the mechanization of the Great War, I'd bet on a band saw.  While circular saws did technically exist during the Civil War they would not be common or in great use until after the war.  Water or steam powered bandsaws were still commonly used to mill lumber.  The French ones also have chamfered edges for longevity.  Given where the chamfer ends near the hook, I'd say it was done with a spoke shave.
     Below you will find the .pdf of our pattern for you to examine and experiment with.  The wood appears to be oak on the French examples.  If not oak, then another common European ring-porous wood like beech or ash.  The grain pattern in the Maple Leaf examples appear to be of oak.  That and oak turns gray when exposed to weather.
    With a few last notes, the measurements for the French stake, I made in imperial measurements.  I'm sure they're actually in metric.  Lastly, don't take anything you make into the field with tool burn marks on the wood.  I see too many sutlers or Civil War woodworkers selling goods with obvious modern tool burn marks.  This may come as a surprise but electric, high-speed shop tools didn't exist 150 years ago.  Short-cutting with modern tools is fine, but take a minute with some sandpaper to disguise it.

​DOWNLOAD OUR FREE TENT STAKE PATTERN BELOW!
​

Picture
WWI French tent stakes
tentstake.pdf
File Size: 133 kb
File Type: pdf
Download File

1 Comment
<<Previous
Forward>>

    2nd USSS, Co. D

    Contact:
    Captain Ethan Whitehall:
    ethanbugs17@gmail.com

    ​Vendors:
    NJ Sekela
    Wambaugh & White
    Regimental Quartermaster
    Townsends

    Dell's Leather Works

    Gun Parts:
    VTI gun parts
    Flintlocks, Etc.
    ​Taylor's & Company


    Firearms Dealers:
    Gun Broker
    Dixie Gun Works

    Other Links:
    Washington Civil War Association
    Happy Friends of Civil War Farb
    Company C Berdan Sharpshooters

    Historically Speaking

    New Recruits:
    WCWA Safety Test


    Other Resources:
    Company D Standing Orders
    Company D Drill Guide
    Berdan Brochure

    Officer Responsibilities

    Handy Reenacting Forms
    Form 4. Accouterments Inventory
    Form 5. Camp and Garrison Equipage 
    2nd USSS Inventory Receipt 

    Archives

    January 2022
    August 2021
    January 2021
    February 2020
    July 2019
    March 2019
    January 2019
    December 2018
    October 2018
    September 2018
    August 2018
    April 2018
    March 2018
    February 2018
    January 2018
    December 2017
    September 2017
    May 2017
    March 2017
    October 2016
    August 2016
    June 2016
    June 2015
    March 2015
    August 2014

    RSS Feed

Proudly powered by Weebly