By Captain Whitehall
One of the most common uniform pieces of the Civil War worn by every branch was the humble fatigue blouse or as reenactors call it “The Sack Coat." While it is commonly worn by reenactors, it is the most commonly incorrect piece of uniform worn and is a far cry from quality reproductions.
It is commonly thought that the US Sharpshooters always wore green frock coats and they would never wear common clothing worn by line infantry. That train of thought however is far from reality, especially with research. In letters home, diaries, after action reports, unit descriptions, and quartermaster reports, it is revealed that Sharpshooters would have worn the fatigue blouse far, far more than the frock. Fatigue blouses were issued for… well, fatigue details like cutting wood, water details, and other work details. They were used because they were loose fitting coats that allowed further body movement and being of a lighter weight wool flannel, was far more comfortable in the heat of summer and as many found out, the heat of combat.
Patrick Brown who wrote the book, “For Fatigue Purposes” states that most of the reproduction sack coats made are too well tailored. The seams are straight and the fit is perfect. Original garments were made quickly by overworked, and underpaid seamstresses trying to support a family. The seamstresses were only paid on average $.20-$.45 per coat. Even in the 1860's these were very low wages. So, for a person to make a living and support her family she would have to work 12-16 hours per day, and make as many coats as possible. With this in mind, the coats were not made to high quality, tailored standards. The material to be used was an Indigo dyed flannel of 5.5 oz per yard. The material also had a “raised wale.” This is the zig-zag pattern you see in the material. The button holes were hand sewn. The machine to sew buttonholes was not produced until after the war. The thread to be used was to be Indigo dyed, much of the thread was, but many contractors also used cheap logwood dyed thread.The logwood dye fades when exposed to the elements. This is why you see many original sack coats with brown thread top stitching.
Shades of color varied widely on original coats. The Indigo dye used was very subject to temperature, humidity, water quality, impurities in the dye, pH of the dye, and the age of the dye. With this in mind, the sack coats were very different in shade from light to dark. Many of the reproduction sack coats are a navy blue rather than a dark blue as were the originals. Sack coats have been found, and documentation located, that shows some sack coats dyed with cheap logwood dye.
The characteristics of mainstream/sutler row blouses are of a dark blue that when faded turn to a purple, unlined and usually a rather large collar that is rolled downwards. These coats are easy to manufacture and take little time and therefore have a low cost from $60 to $80 so these are fine to reenactors just getting into the hobby and want to hit the field quickly. Then there are the all hand or mostly hand sewn “authentic quality” blouses that can cost as much as $500. While these are of proper color weight and construction they are obviously more expensive and of course, who of us can afford to spend $500 on one coat?
Some quality vendors out there though are producing one of the best deals and ideas around, kits. With a kit from vendors like Wambaugh, White & Co. materials are pre-cut with thread, buttons and instructions provided. All that is needed is to either sew it yourself or have someone do the needle work. The plus side of this besides being of correct weight and color is that its hand sewn as per originals and the selling deal on many including the writer of this article is cost. A fully sewn blouse ranges from $350 to $500 depending how much hand sewing you want, as where a kit comes in at a fraction of the price in the $130 range. That is a steal for the quality AND authenticity you want to get.
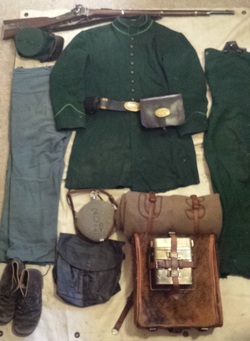
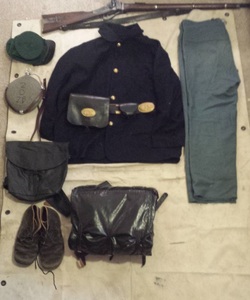
If all you can afford is a cheap mainstream fatigue blouse, no big deal and happy reenacting. Save your money, though, and for a few dollars more and you can get a deal and one of the best reproduction blouses out on the battlefield, you will have the serious look of a reenactor and a sharpshooter in Company D. Below are pictures showing a coat made from a kit and one bought from a mainstream quality vendor, you will see the quality and differences instantly.
One of the most common uniform pieces of the Civil War worn by every branch was the humble fatigue blouse or as reenactors call it “The Sack Coat." While it is commonly worn by reenactors, it is the most commonly incorrect piece of uniform worn and is a far cry from quality reproductions.
It is commonly thought that the US Sharpshooters always wore green frock coats and they would never wear common clothing worn by line infantry. That train of thought however is far from reality, especially with research. In letters home, diaries, after action reports, unit descriptions, and quartermaster reports, it is revealed that Sharpshooters would have worn the fatigue blouse far, far more than the frock. Fatigue blouses were issued for… well, fatigue details like cutting wood, water details, and other work details. They were used because they were loose fitting coats that allowed further body movement and being of a lighter weight wool flannel, was far more comfortable in the heat of summer and as many found out, the heat of combat.
Patrick Brown who wrote the book, “For Fatigue Purposes” states that most of the reproduction sack coats made are too well tailored. The seams are straight and the fit is perfect. Original garments were made quickly by overworked, and underpaid seamstresses trying to support a family. The seamstresses were only paid on average $.20-$.45 per coat. Even in the 1860's these were very low wages. So, for a person to make a living and support her family she would have to work 12-16 hours per day, and make as many coats as possible. With this in mind, the coats were not made to high quality, tailored standards. The material to be used was an Indigo dyed flannel of 5.5 oz per yard. The material also had a “raised wale.” This is the zig-zag pattern you see in the material. The button holes were hand sewn. The machine to sew buttonholes was not produced until after the war. The thread to be used was to be Indigo dyed, much of the thread was, but many contractors also used cheap logwood dyed thread.The logwood dye fades when exposed to the elements. This is why you see many original sack coats with brown thread top stitching.
Shades of color varied widely on original coats. The Indigo dye used was very subject to temperature, humidity, water quality, impurities in the dye, pH of the dye, and the age of the dye. With this in mind, the sack coats were very different in shade from light to dark. Many of the reproduction sack coats are a navy blue rather than a dark blue as were the originals. Sack coats have been found, and documentation located, that shows some sack coats dyed with cheap logwood dye.
The characteristics of mainstream/sutler row blouses are of a dark blue that when faded turn to a purple, unlined and usually a rather large collar that is rolled downwards. These coats are easy to manufacture and take little time and therefore have a low cost from $60 to $80 so these are fine to reenactors just getting into the hobby and want to hit the field quickly. Then there are the all hand or mostly hand sewn “authentic quality” blouses that can cost as much as $500. While these are of proper color weight and construction they are obviously more expensive and of course, who of us can afford to spend $500 on one coat?
Some quality vendors out there though are producing one of the best deals and ideas around, kits. With a kit from vendors like Wambaugh, White & Co. materials are pre-cut with thread, buttons and instructions provided. All that is needed is to either sew it yourself or have someone do the needle work. The plus side of this besides being of correct weight and color is that its hand sewn as per originals and the selling deal on many including the writer of this article is cost. A fully sewn blouse ranges from $350 to $500 depending how much hand sewing you want, as where a kit comes in at a fraction of the price in the $130 range. That is a steal for the quality AND authenticity you want to get.
If all you can afford is a cheap mainstream fatigue blouse, no big deal and happy reenacting. Save your money, though, and for a few dollars more and you can get a deal and one of the best reproduction blouses out on the battlefield, you will have the serious look of a reenactor and a sharpshooter in Company D. Below are pictures showing a coat made from a kit and one bought from a mainstream quality vendor, you will see the quality and differences instantly.
 RSS Feed