2nd United States Sharpshooters, Company D
  • Home
  • About
    • Meet Company D
  • Military Life
    • Uniforms and Gear
    • Drill and Tactics
  • Research Library
  • Civilian
  • Armory

Uniforms and Gear

Welcome to our uniforms and gear page.  These resources explain our gear and list articles and resources to improve your impression.  Texts in italics are straight from army regulations.

Machining the Pull Through Brass Ferrule

4/25/2018

0 Comments

 
By 1st Sgt. Koepp

     In the words of the great Ron Swanson, "Buying things is for suckers."  Well, in this case, I couldn't find the 10-32 threaded ferrules to buy if I wanted to.  So, breaking with our tradition of "every man" projects, I figured I'd show how I went about recreating these oddly difficult to find items.
     I started with ordering a couple of 1/4" brass rods from Amazon.  I cut them to easy to work lengths on my bandsaw and headed over to my buddy's shop to use his machinist's lathe.  I locked in the brass rod into the three jaw chuck and put a center bit in the tail stock chuck.  Center bits are really important when boring.  Their stout design doesn't allow them to wander like a regular twist bit.  You can also buy these affordably on Amazon.
     With the lathe running at a moderate speed, I began "pecking" at the end of the brass rod with the center bit until it started to really dig in.  With the starter hole and counter sink cut in, I began working my way in drill bit sizes until my final 5/32" bore.  According to my handy dandy machinist's app, 5/32" is the proper bit size to tap 10-32 threads.
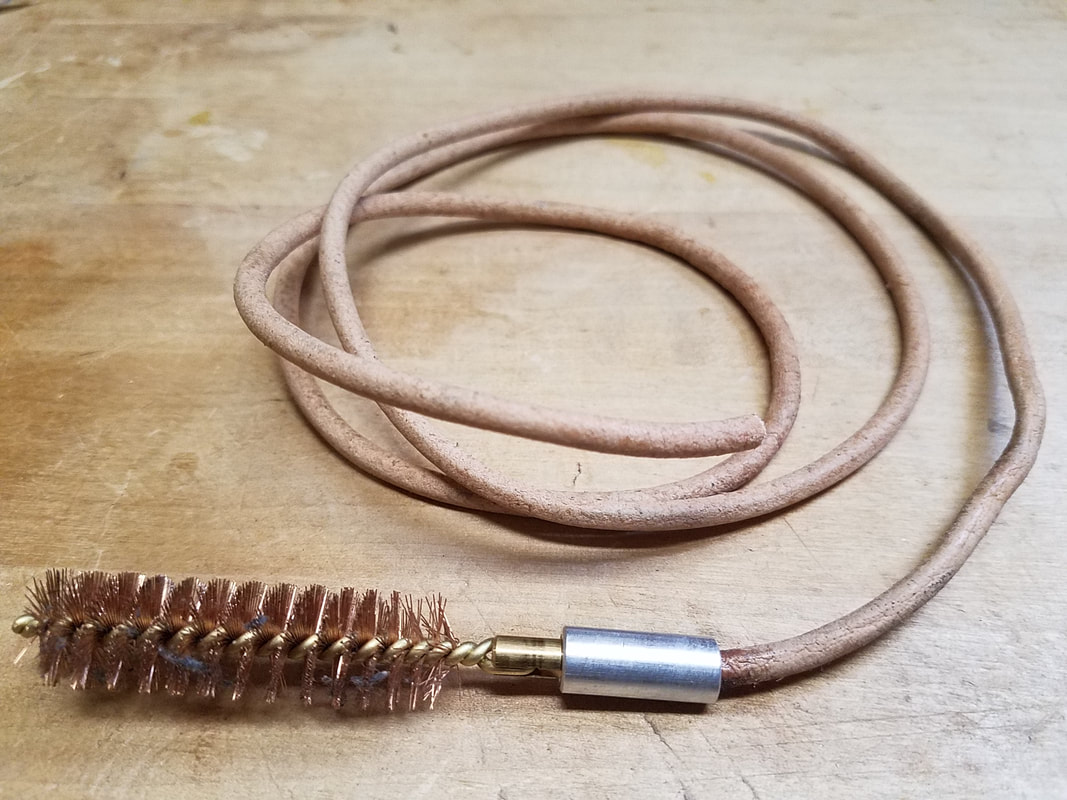
     I bored several blanks before returning to my shop to finish the ferrules.  I cut them to exact length then chucked them into my drill press to square and smooth each end.  Finally, I grabbed my tap and some tapping fluid and cut in the threads.  I locked the ferrule just snug enough into the vice to resist the tap.  Be very careful because the brass is soft and too much vice pressure will turn it into an oval in no time.  When you're done with that, all you have to do is thread in the 4mm leather thong, take it out, apply some two part epoxy and reinstall to let dry.  The end result is a surprisingly rare, but authentic brass ferrule Civil War pull through cleaner.  Just screw in the brush of your desired size.
     Now, if you don't have access to a machinist's lathe, don't worry.  If you have some patience and a little extra time, you can do this same thing reasonably well with a drill press.  You see in one of my photos that I put the drill bit squarely in the vice and not in the press.  I put the brass blank in the drill press chuck, effectively turning the drill press into a vertical lathe.  There are some really clever YouTube videos out there that can walk you through the entire process.
0 Comments

Recreating the Sharps Pull-Through Brush

4/15/2018

7 Comments

 
Picture
By 1st Sgt. Koepp

     It wasn't until the research of Pvt. Ternan about a year ago that I learned these were actually a thing.  I was under the mistaken assumption that pull-through cleaners were a 20th century item, much like you would see issued with a 1917 Enfield or 1903 Springfield.  However, not only were two styles of these brushes available for the Sharps rifle, but they also existed for other calibers.  I'm guessing their relative scarcity today has more to do with the fragility of their natural construction rather than lack of use.  Having one of these in your implement pouch would be immensely useful because, as you all know, Sharps rifles don't have a cleaning rod.  Though rods were likely issued in the crates maybe 1 for every 10 rifles.
     Now, you can sometimes find originals on Ebay for around $100-150.  The carbine models tend to be a bit cheaper but I've resisted buying one because originals are .52 caliber and our reproduction Sharps are .54.  So, after studying many pictures and the book, "Gun Tools Their History and Identification," I thought I'd begin my experimentation.  My design ideas will look the part, though as of now, won't be 100% authentic.  I wanted my design to be accessible to everyone to try to experiment with.  If you have some brass round stock and a machinist lathe, this wouldn't take long to build, however, not many people are set up for machinist work.  Also, original brushes were made of natural materials and the one's I've seen weren't brass bristle.  So, clearly, I'm only at the proof of concept stage.  
     As with many Civil War items there is a great deal of variance in surviving examples.  These include differences in brush material, brush length, thong length, and even if the ferrule was female threaded or fixed to the brush as a solid item.
     I started with making the late/post war single thong Sharps pull through, though single pulls existed and in many other calibers.  I chose to recreate the models with a threaded female ferrule to increase its usefulness and it appears these were more common.  This way you can replace the brushes as they wear out or even use a mop if you like.  Though, those weren't used then.  I'm just saying this is more adaptable to modern cleaning practices.  I found an original example online that had a thong that measured 39 1/2" and checking that length to my Sharps; it appeared a good length.  I chose a 3/4" long ferrule with a 10-32 thread, easily found at a good hardware store like Ace, because that is a very common modern industry standard for black powder cleaning implements.  Finding leather thong online is very simple to do.  I found that 4 mm thong fits beautifully into the ferrule.  I simply find how much of the thong needs to go in before it hits the top of the brush threads.  I mark that distance, remove the thong, apply a light coat of two part epoxy, and reinsert the thong to dry in place.
     The part I'm struggling with and could really use your help with is that I can't seem to find a brass "spacer" or "standoff" as they're sometimes called.  I can only find them in aluminum.  I think I've seen steel, but you don't want a hard metal involved in your rifle cleaning setup.  While aluminum was known of and did exist during the Civil War, it was more expensive than gold and really only existed in science laboratories.  Commercial availability of aluminum didn't come about until many years later.  I can machine them in brass but that eliminates the "common man" nature of the build.  If it comes down to it, I might just end up machining these and selling them.  So, if you know a place to buy 10-32 or even 8-32 1" long brass standoffs, please post a comment on our Facebook page so we can bring this part of Sharpshooter history back to life.  
     In the meantime, I'm going to try out my aluminum ferrule and see how it works.
7 Comments

Making a Civil War Cone Pick

4/11/2018

2 Comments

 
 By 1st Sgt. Koepp
     I guess by now, I should be less surprised that such a simple item as cone pick isn't represented in a how-to.  I'm pretty passionate about recreating the obvious, the overlooked, and under-represented. I've made some educated guesses as to how to make these based of photos of originals and what I've read.  I admit this is an experiment and bit of a proof of concept.  The one key piece of information I'm lacking is the actual wire diameter of the originals.  I tried piano wire at first only to find that it was a bit over kill.  I then thought I'd try some 18 gauge wire I had in my shop and after some heat treating it seems to work great.  My 18 gauge wire measures .039 inches.  If someone reading this has reliable thickness readings on an original, please share it with the community.  Enough preamble, let's get into how I did it.

What you'll need:
  1. Wire.  I used galvanized--avoid it if you can.  When galvanized metal gets hot it releases poisonous gas.  I have air scrubbers, lots of ventilation in my shop, and experience so I did it, but I recommend regular steel wire.
  2. Propane Torch or reliable heat source.  Mapp gas will be much too hot a flame.
  3. Hammer
  4. Needle Nose Pliers
  5. Wire Cutters
  6. A form to help bend the wire.  The loop should be 1/2" wide.  In my case I found a 1/4" drive 11/32" deep socket met that requirement just fine for me.
  7. Bench Vise  
  8. Container of Water
  9. Container of Oil.  I used SAE 30.
  10. Tape Measure or Measuring Device
  11. Belt Sander or File to make a taper on the end of the pick

     I start with cutting a piece of wire longer than the finished product to give more to hang on to.  I then lock my form into my vice and using my fingers bend the wire into a loop around the form.  I use the needle nose pliers for any minor adjustments.  I then trim the pick to length.  The documentation I've consistently seen states the shaft should be 1 1/2" long.  I then take the pick to the belt sander and rotate the pick to get an even point on the end.  Using my hammer, anvil, and fingers I straighten the wire to my liking before moving on.  After that, I fire up my propane torch and with the pick in a pair of pliers, I try my best to evenly heat the pick to a red hot.  This only takes a few seconds.  Once there, I quickly quench in water to harden the wire.  For a bit of rust protection and nicer finish, I'll simply re-heat and quench in oil.  The second heat is just to warm it up.  I don't try to make it red hot again.  After it cools for a few seconds, I wipe clean and it's ready for service.  When you flick the end of it with your finger, it should spring back to shape and not easily bend.  Keep in mind, it's wire so it will bend with enough force but should be considerably harder than when it came off the spool.
   This only takes a few minutes to do and is quite rewarding.  If anyone out there has more technical information on the originals let us know on our website or Facebook page.  Also, if anyone is more knowledgeable in metallurgy than me share a tip if you have one.
2 Comments

    2nd USSS, Co. D

    Contact:
    Captain Ethan Whitehall:
    ethanbugs17@gmail.com

    ​Vendors:
    NJ Sekela
    Wambaugh & White
    Regimental Quartermaster
    Townsends

    Dell's Leather Works

    Gun Parts:
    VTI gun parts
    Flintlocks, Etc.
    ​Taylor's & Company


    Firearms Dealers:
    Gun Broker
    Dixie Gun Works

    Other Links:
    Washington Civil War Association
    Happy Friends of Civil War Farb
    Company C Berdan Sharpshooters

    Historically Speaking

    New Recruits:
    WCWA Safety Test


    Other Resources:
    Company D Standing Orders
    Company D Drill Guide
    Berdan Brochure

    Officer Responsibilities

    Handy Reenacting Forms
    Form 4. Accouterments Inventory
    Form 5. Camp and Garrison Equipage 
    2nd USSS Inventory Receipt 

    Archives

    January 2022
    August 2021
    January 2021
    February 2020
    July 2019
    March 2019
    January 2019
    December 2018
    October 2018
    September 2018
    August 2018
    April 2018
    March 2018
    February 2018
    January 2018
    December 2017
    September 2017
    May 2017
    March 2017
    October 2016
    August 2016
    June 2016
    June 2015
    March 2015
    August 2014

    RSS Feed

Proudly powered by Weebly