2nd United States Sharpshooters, Company D
  • Home
  • About
    • Meet Company D
  • Military Life
    • Uniforms and Gear
    • Drill and Tactics
  • Research Library
  • Civilian
  • Armory

Uniforms and Gear

Welcome to our uniforms and gear page.  These resources explain our gear and list articles and resources to improve your impression.  Texts in italics are straight from army regulations.

Have you considered a company cleaning kit?

3/23/2017

1 Comment

 
Picture
     We all know how high maintenance Sharps rifles can be.  What does your unit do for new recruits who don't have a cleaning kit yet?  Or what options are available for cleaning the loaner rifles?
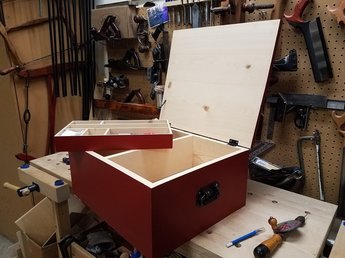
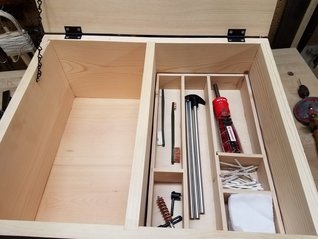
     After years of perfecting our gear we also grew a little tired of passing around our kit to the newbies or being constantly asked for something else while the rest of us are resting or eating supper.  Our leadership decided to pitch in to build and supply a company cleaning kit that would be supervised by our unofficial ordinance private.
     I constructed the box out of 3/4 pine, box jointed, tongue/grooved, rabbits and dadoes.  There are no fasteners holding this box together.  Hardware includes blacksmithed handles, some mortised hinges, and a chain for the lid.  I ended up finishing the inside with a brush on poly so it could handle some abuse or spillage. You can learn more about this box construction in one of our YouTube videos.
      One side of the box contains three wooden trays with identical supplies.  The other side which is open is for refills and specialty tools as needed. Several of us pitched in stocking it up and then we'll be charging just a dollar a day for our recruits to use it.  We encourage our recruits to have their own kit whether they have a Sharps yet or not but still want to maintain high standards of cleaning and maintenance for those not quite there yet.  

Picture
1 Comment

A Camp Table

3/23/2017

2 Comments

 
Picture
By: 1st Sgt. Koepp
     This is a photo of my most recent piece of camp furniture though I wasn't quite complete with it when I took this photo.  The finishing touches included nailing and removing cut nails to simulate the lid actually being attached to a crate as well as a coat of boiled linseed oil and painting the end grain of the legs for durability.
     Our clerk needed a desk and I love designing camp furniture so I really wanted to make this special.  I debated for a long time on how to make the legs.  I thought about folding legs, turned legs, and even mortise and tenon.  Yet, I decided since this needs to be transported across the state for events it also need to be compact.  So, months ago, I cut down a small fir tree in the front half of my property, cut to length, shaved the bark off, and let it slowly dry in my shop until ready to work.  
      Once ready, I shaped the legs on the shave horse and used my jointing hand plane to straighten the legs a bit more.  It wasn't necessary but I wanted it to look a bit cleaner.  I found centers, drilled holes, and epoxied 5/16" bolts in the ends.  In the stretchers, I drilled, epoxied, and inserted matching t-nuts.  This way, the legs have the look of being tenoned into the stretchers but the modern convenience of having screw out legs.
     The top is a basic hard tack crate lid.  I tongue and grooved the boards with my Lee Nielsen tongue and grove hand plane but you can do it just as easily as with a table saw and glued them together.  The key finishing touch, that almost no one does, is to actually take the time to attach the split saplings that held the crate closed.  This just took a quick stroll in our yard and I found a relatively straight maple sapling, split it, shaved it a bit with a pocket knife, drilled, and attached with shortened 1 1/2 cut nails.  The added benefit of the saplings still being on the lid is they help keep items from rolling off. The whole project was probably about $40 or less in materials.  
     The hardest part of the project for me was consciously leaving parts of the finish rough.  I had to keep reminding myself this item needs to look like it was field made and not made in a joinery shop.  I hope this project inspires you to make your own camp furniture.


2 Comments

    2nd USSS, Co. D

    Contact:
    Captain Ethan Whitehall:
    ethanbugs17@gmail.com

    ​Vendors:
    NJ Sekela
    Wambaugh & White
    Regimental Quartermaster
    Townsends

    Dell's Leather Works

    Gun Parts:
    VTI gun parts
    Flintlocks, Etc.
    ​Taylor's & Company


    Firearms Dealers:
    Gun Broker
    Dixie Gun Works

    Other Links:
    Washington Civil War Association
    Happy Friends of Civil War Farb
    Company C Berdan Sharpshooters

    Historically Speaking

    New Recruits:
    WCWA Safety Test


    Other Resources:
    Company D Standing Orders
    Company D Drill Guide
    Berdan Brochure

    Officer Responsibilities

    Handy Reenacting Forms
    Form 4. Accouterments Inventory
    Form 5. Camp and Garrison Equipage 
    2nd USSS Inventory Receipt 

    Archives

    January 2022
    August 2021
    January 2021
    February 2020
    July 2019
    March 2019
    January 2019
    December 2018
    October 2018
    September 2018
    August 2018
    April 2018
    March 2018
    February 2018
    January 2018
    December 2017
    September 2017
    May 2017
    March 2017
    October 2016
    August 2016
    June 2016
    June 2015
    March 2015
    August 2014

    RSS Feed

Proudly powered by Weebly