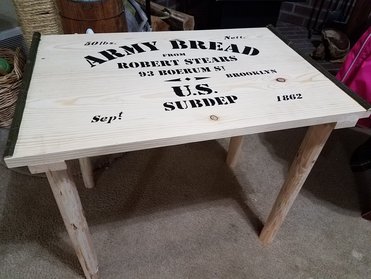
This is a photo of my most recent piece of camp furniture though I wasn't quite complete with it when I took this photo. The finishing touches included nailing and removing cut nails to simulate the lid actually being attached to a crate as well as a coat of boiled linseed oil and painting the end grain of the legs for durability.
Our clerk needed a desk and I love designing camp furniture so I really wanted to make this special. I debated for a long time on how to make the legs. I thought about folding legs, turned legs, and even mortise and tenon. Yet, I decided since this needs to be transported across the state for events it also need to be compact. So, months ago, I cut down a small fir tree in the front half of my property, cut to length, shaved the bark off, and let it slowly dry in my shop until ready to work.
Once ready, I shaped the legs on the shave horse and used my jointing hand plane to straighten the legs a bit more. It wasn't necessary but I wanted it to look a bit cleaner. I found centers, drilled holes, and epoxied 5/16" bolts in the ends. In the stretchers, I drilled, epoxied, and inserted matching t-nuts. This way, the legs have the look of being tenoned into the stretchers but the modern convenience of having screw out legs.
The top is a basic hard tack crate lid. I tongue and grooved the boards with my Lee Nielsen tongue and grove hand plane but you can do it just as easily as with a table saw and glued them together. The key finishing touch, that almost no one does, is to actually take the time to attach the split saplings that held the crate closed. This just took a quick stroll in our yard and I found a relatively straight maple sapling, split it, shaved it a bit with a pocket knife, drilled, and attached with shortened 1 1/2 cut nails. The added benefit of the saplings still being on the lid is they help keep items from rolling off. The whole project was probably about $40 or less in materials.
The hardest part of the project for me was consciously leaving parts of the finish rough. I had to keep reminding myself this item needs to look like it was field made and not made in a joinery shop. I hope this project inspires you to make your own camp furniture.
 RSS Feed